Table of Contents

Settings Tab

*For Monitor Settings go to the Dashboard section below.

Select a Device

This selection will display a list of all supported pulse oximeters sorted by brand name. When selecting a device from the list a ‘Pulse Oximeter Information’ page is displayed with the pulse oximeter’s details including its supported parameters. Tap the device’s image to display a larger view of the pulse oximeter. To select a device tap the ‘Select Device’ button, the button’s title will then change to ‘Deselect Device’. When selecting a different pulse oximeter it isn’t necessary to deselect the currently selected device first, just select the new pulse oximeter. Once a device is selected it is registered with the app, and can be connected to in the Dashboard.

Selected Device

This selection will display the Pulse Oximeter Information page for the selected device. The pulse oximeter can be deselected from here, but if the intent is to switch to another device, simply go to the list of supported device and select a new device. The Selected Device cell will update to show the new selection. If a device is not selected, then tapping this cell will not perform an action.

App Theme Color

This selection allows transitioning between dark and light mode for the entire app interface. Tapping the cell will switch between the two modes. If the mobile device is running on iOS 13 or higher operating system, then a third option will be displayed - ‘System Controlled’. With this option selected the app’s color theme will be controlled with the ‘Appearance’ setting in Setting -> Display & Brightness.

Set Date/Time Format

This selection is to set the date/time display format throughout the app. This allow the app to support international date/time display standards. The month can be displayed in a three letter abbreviated format (English), or as the month number. The day, month and year can be arranged to conform to local date display standards. The time format can be displayed as 12 hour (AM/PM) or as 24 hour.

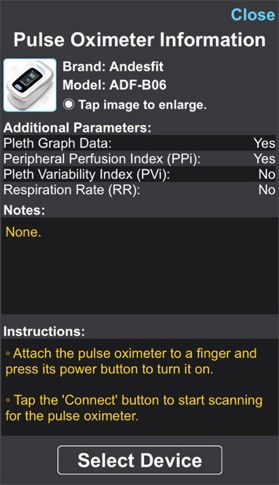
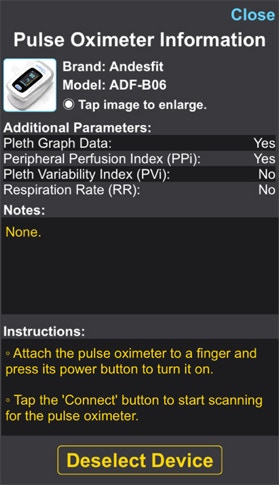
Connect to Apple Health

This selection will display the Apple Health permissions view. Here you can select which parameters you wish to share with Apple Health. SpO2, Pulse Rate, Perfusion Index and Respiratory Rate are supported. At this time only writing to Apple Health is supported, reading from Health is not.

This view will only be displayed once. After it has been viewed and closed, future changes or updates will need to be made within the Health app. It is recommended that you select to share all parameters with Health even if your pulse oximeter doesn’t support all the listed parameters. Should you use later use a pulse oximeter that does support all the listed parameters, all data will be saved to Health.

Show Quick Guide

This selection will display the Quick Guide.

App Information

This selection will display the User License Agreement, the app’s version number and any copyright and trademark disclaimers.

Dashboard Tab

The Dashboard tab is central to the app, and is where all data collected from the pulse oximeter is displayed. Central to the dashboard is the Monitor View which provides the controls for the device and displays real-time parameter data as it’s received from the pulse oximeter. The line graph views chart the data received from the pulse oximeter at one second intervals. The SpO2 line graph view is fixed, but the line graph views for pulse rate and all other supported parameters can be scrolled side-to-side to reveal them. The recording session controls view indicates whether the monitor is connected, monitoring or recording, and is also where the recording time is set. 

Monitor View

This is the heart to the app. This view displays all data received from the pulse oximeter and also provides controls for the device. All pulse oximeters by default support SpO2 and pulse rate parameter data. Parameters not supported by the pulse oximeter will display ‘- -‘ in their labels. If the device does not support pleth graph data, the graph view will display ‘No Graph Data’. The Pulse Bar is available only if pleth graph data is available.

The left button connects and disconnects from the pulse oximeter. The Device Status Indicator shows the pulse oximeter’s connected state with the following indications: 

  • If not connected, the indicator background will be red and state ‘Not Connected’.
  • If the app is searching for the pulse oximeter to connect, the indicator background will be yellow and state ‘Scanning’.
  • If the app has found the pulse oximeter, but has not yet connected, the indicator background will be yellowed and state ‘Found’.
  • If the app connects to the pulse oximeter, the indicator background will be green and state the model of the pulse oximeter connected.

The right button initiates a spot check measurement. A spot check is an instantaneous measurement of all parameters. When a spot check measurement is initiated the Device Status Indicator will count down from the seconds to the measurement. The ten second count down is to ensure the user being measured stay still and stable for the measurement. Spot check measurements can be set to disconnect from the pulse oximeter on completing the measurement, or they can remain connected. This option can be set in the Monitor Settings (see below).


If your pulse oximeter is a spot check only device, then the monitor view will change to accommodate only the SpO2 and pulse rate parameters as shown here.

Monitor Alarm Settings

This view allows enabling, disabling and settings alarms for SpO2, pulse rate and peripheral perfusion index parameters, as well as enabling and disabling the the alarm audio. Alarm settings made in this view will be reflected in the alarm zones in each of the corresponding line graph views. High SpO2 alarm also includes a time setting before triggering the high SpO2 alarm condition. This setting ranges from zero to two, then five second intervals up to 60 seconds. An example use of this is, if the time setting is set to two minutes, then the high SpO2 alarm condition will not be triggered until SpO2 has been in the high SpO2 alarm zone continuously for two minutes or longer. If the SpO2 drops below the set high limit momentarily, and then rises above the high limit once again the timer starts from zero.

High pulse rate and low pulse rate settings do overlap. If adjusting the first value encroaches on the setting of the second value, then the second value will adjust automatically.

Alarms use the system audio, and their volume can be controlled with the ringer volume buttons on the side of the mobile device, or disabled altogether with the ‘Audio Alarm’ switch.

Muting/Unmuting Alarms
When an alarm condition is triggered the parameter label in the monitor will flash at a one second interval along with the alarm tone. The alarm tone will increase in pitch if there is a high alarm condition, and will decrease in pitch if there is a low alarm condition. If there is more than one alarm condition, with a high and a low alarm condition in two or more separate parameters, then the alarm tones will alternate between high and low. Tapping the label that is in alarm condition, or tapping any label in alarm condition if there is more than one, will mute all alarms. Each alarm can be unmuted by tapping a label that continues to be in alarm condition.

Monitor Settings

These settings affect the monitor view only.

Display Pulse Bar: Enables/disables the pulse bar in the pleth graph view. The pulse bar is only available if the pulse oximeter supports pleth graph data.

Monitor Color: Switches the monitor display color between cyan and yellow.

Disconnect on Spot Check: When enabled will disconnect from the pulse oximeter when a spot check measurements is complete. If disabled, the monitor will remain connected and continue to receiving data fro the pulse oximeter.

Pulse Tone: Allows selecting from five different tones to indicate a pulse. Set to zero to turn the tones off. Pulse tones are only available if the pulse oximeter supports pleth graph data.

Tone Volume: Allows settings the pulse tone volume.

Parameter Line Graph Views

The line graph views monitor each parameter in a time domain graph. Only parameters supported by the connected pulse oximeter will be displayed. The SpO2 line graph view is fixed in place, but the other parameters can be scrolled side-to-side to bring into view. Each line graph is identified with the parameter name on the top-left corner of the view. The Min, Avg and Max values are calculated in real-time while monitoring. If a recording session starts the values are reset and again calculated in real-time during the recording. When the recording is complete the values are again reset for monitoring.

While monitoring the Y-axis is constantly updated to maintain the latest line graph data in view. While recording the Y-axis will expand to show the entire range of the line graph.

When in monitoring mode the line graph will display a rolling 60 seconds of data. When recording the entire time frame is displayed.

If alarm settings are set and enabled for either SpO2, pulse rate or peripheral perfusion index, the alarm setting will indicated in blue for high alarm and red for low alarm. If a parameter value enters an alarm region the shade of blue or red will highlight to indicate an alarm condition.

Recording Control View

The recording control view allows setting and initiating a data recording session. Recording sessions of two minutes up to ten hours can be set. Data is recorded at one second intervals. Parameter data and time in alarm condition is recorded. Pleth graph data is not recorded. Parameters recorded are only those supported by the connected pulse oximeter.

The recording control view provides an indication of whether the monitor is in ‘Monitoring’ mode, ‘Recording’ mode or not connected a device. To start a recording session a device must be connected to the monitor. Tap the recording time button to display a picker view, and select the desired time to record. Tap the recording time button again to set the time.

Recording can be started when the ‘Start Recording’ button is green. While recording the button will be red and read ‘Stop Recording’. The recording can be stopped at any time before the set time expires, but a warning message will be displayed asking to confirm. Data recorded up to that point will be saved. Recordings can also be stopped by disconnecting from the monitor view before the the set time has expired, but again a message will be displayed to confirm. If the device disconnects on its own, the recording will stop and data saved up to that point will be saved.

History Tab

The history scatter plot view displays all captured measurements in chronological order with the latest measurement to the right most are of the view. The time frame of the scatter plot view can be set to week, month or year with the represented start and end dates displayed above left and above right of the view. Tapping either the start date or end date will display the custom date range dialog to narrow the view to data of interest.

Scatter plot view data for each captured parameter can be displayed separately by selecting the desired parameter. Each measurement record is listed in chronological order with the latest capture at the top of the list of the table.

History Scatter Plot View

The history scatter plot view displays all captured measurements as points in time. Every parameter is displayed separately with parameter select buttons. The parameters buttons shown will vary depending on the parameters captured and stored in the measurement database.

In the view area, recordings a designated with a ‘Dot’, and spot checks with a ‘Donut’. The Min, Avg and Max values displayed above the view are those for all values currently displayed in the view. Selecting a different time frame, settings a custom date range or selecting a different parameter will update the Min, Avg and Max accordingly.

Swiping the view left or right will shift the date range. The range of the shift will depend on the selected time frame.


The date range for the scatter plot view can be customized. Tapping either the start or end date will display the custom date range dialog. The start and end date buttons will show the current start and end dates in the view respectively. Tap either button to display a picker view to select a new date. Once selected, tap the same button to set the date. The minimum number of days that can be set is seven, and the maximum is 365. The earliest date that can be viewed is January 01, 2021.

Measurement Table View

The measurement table view below the history scatter plot view displays all measurements captured in chronological order, with the latest measurement at the top of the measurement table list. The cell backgrounds alternate in colors to make them easier to view. The measurement type in each record indicates a recording or spot check. Recordings will display average SpO2 and average pulse rate. Spot check records display the captured SpO2 and pulse rate values.

For recording, the date/time shown is when the recording was completed or stopped. For spot checks, the date/time indicates when the measurement was captured.

Swiping left on a row will display a delete option for that measurement. Tap ‘Delete’ to permanently remove that measurement from the list. Note that deleting a measurement from the Pulse Oximetry app does not delete the corresponding measurement from Apple’s Health app. Those measurements must be deleted separately.

Measurement Flags

Flags allow for easy referencing of measurements that are of significance, or they can be used as ‘bookends’ to indicate the start and end of a period of significance. To flag a measurement swipe right on that line to expose the menu options, then tap ‘Flag’.

When a measurement has been flagged, a red indicator will be displayed on the left side of the line, and the corresponding parameter markers will be colored red in the scatter plot view. To remove a flag from a measurement, swipe right on that line to expose the menu options, then tap ‘Unflag’.

Measurement Reviews

Tapping on a row in the measurement table view will display either a recording review page or spot check review page. Each page provides in-depth details of the selected measurement. Parameters not supported by the pulse oximeter that captured the measurement will be indicated with ‘- -‘. Notes can be added by tapping the note icon in the top-right corner of the page. A note dialog will display along with the keyboard. A maximum of 250 characters are allowed in notes.

In the recording review page, the alarm times refer to the amount of time that parameter was in alarm condition during the recorded session. Below the time is the representation in percentage, with 100% being the entire recording time. Time in High SpO2 refers to the amount of time SpO2 was in the high alarm zone, but not in alarm condition. The SpO2 line graph is fixed, but all other parameters line graphs can be scrolled left or right to bring into view.

Copyright 2021 App in Lights. Designed by Victor Galvez.